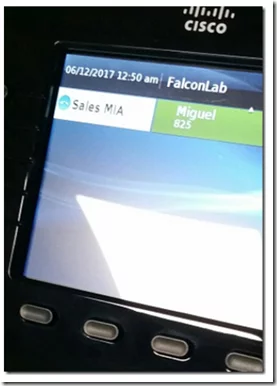
Although not officially supported, Cisco CP 8961 and 9971 phones can be easily configured for use on FreePBX, Elastix and most Asterisk PBX systems. This step by step guide will provide the provisioning configuration details. The steps are:
- Configuring Asterisk to allow TCP protocol for use on specific IP phones.
- Setting up a DHCP server with TFTP option 150.
- Setting up a TFTP server.
- Configuring extensions in Asterisk.
- Creating XML configuration files for the IP phones.
For this post, we will be using Elastix 2.5, Windows DHCP and SolarWinds TFTP server, however you can adjust according to your own product preference. We will be using Cisco CP-9971 and CP-8961 with firmware version 9.3 however other Cisco UC phones will work as well. Note: you should have at least firmware 9.0 installed on the phones in order to use SIP protocol and work with Asterisk.
Configuring Asterisk to use TCP
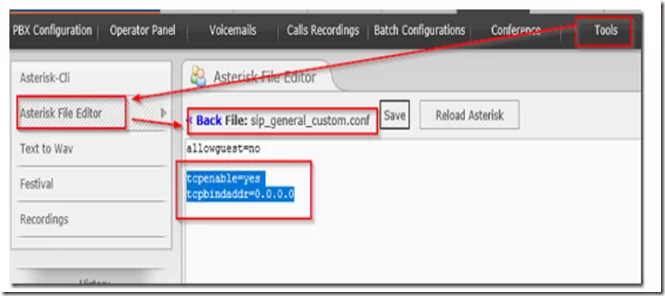
To configure Asterisk to allow the use of TCP in transport, log in to the Web UI and navigate to the Asterisk file editor. Locate the sip_general_custom.conf and add the following lines:
tcpenable=yes
tcpbindaddr=0.0.0.0
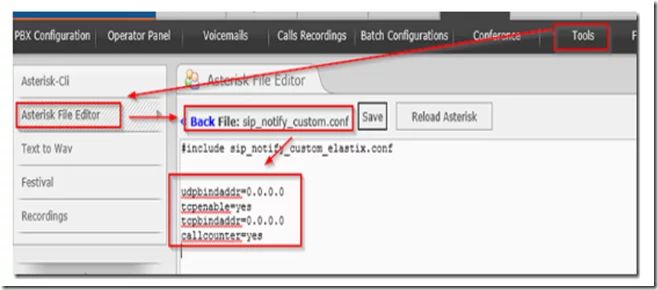
After you save the changes, locate sip_notify_custom.conf and add the following lines:
udpbindaddr=0.0.0.0
tcpenable=yes
tcpbindaddr=0.0.0.0
callcounter=yes
When finished, click save and the reload Asterisk.
Configuring the TFTP Server
Download and install the TFTP Server of your choice or download and install a free TFTP server from SolarWinds by clicking here.
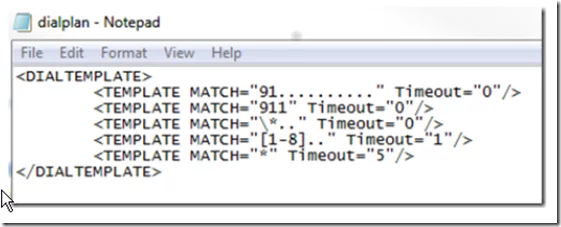
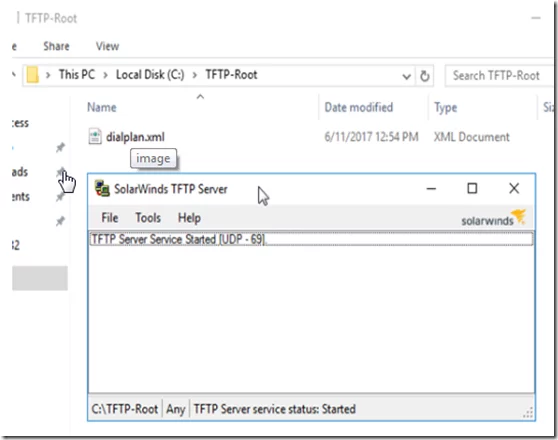
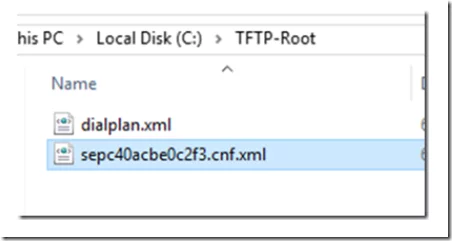
Inside the default TFTP folder (c:\TFTP-Root if using Solarwinds), create a file using Windows notepad. Name it ‘dialplan.xml’ and copy/paste the text below to the file.
<DIALTEMPLATE>
<TEMPLATE MATCH=”91……….” Timeout=”0″/>
<TEMPLATE MATCH=”911″ Timeout=”0″/>
<TEMPLATE MATCH=”\*..” Timeout=”0″/>
<TEMPLATE MATCH=”[1-8]..” Timeout=”1″/>
<TEMPLATE MATCH=”*” Timeout=”5″/>
< /DIALTEMPLATE>
When you have finished, save the file and make sure that the TFTP server is running.
Configuring the DHCP Server
Next, we will need to configure our DHCP server to use option 150 so that the IP phones obtain the IP address of the TFTP server from the DHCP server. The Cisco IP phones will use the TFTP server to download and install their respective provisioning configurations.
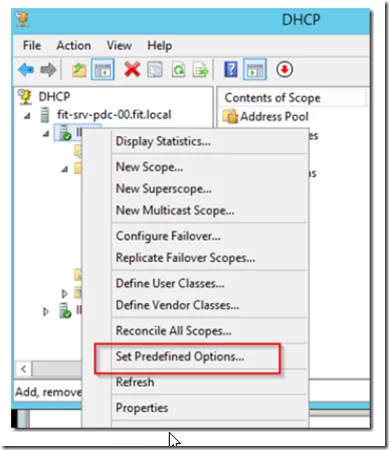
Open Windows DHCP server MMC and right click on the IPV4 server and select set predefined options.
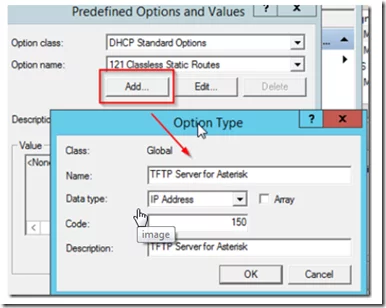
Click add and give the option a name and a description. Select IP address as the data type and 150 as the code.
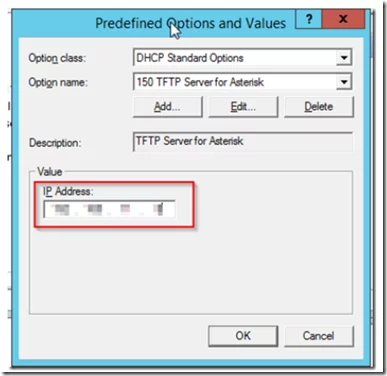
Add the TFTP server’s IP address to the value field and click OK.
Configuring Extensions and Phones
1. Creating/configuring the phone extensions in the Elastic UI
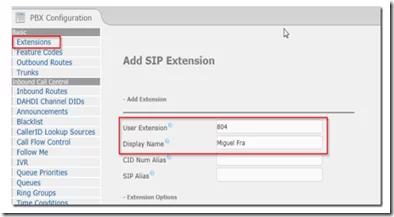
From the Elastix Web UI, navigate to PBX->Configuration->Extensions. Select to add a generic SIP device.
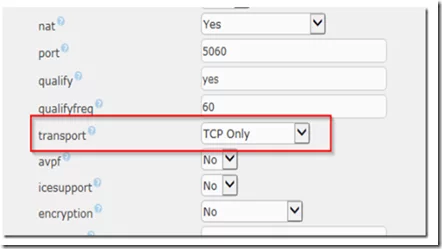
Enter the extension number and relevant information, then save the settings. Go back and edit the extension and look for the transport option. If your version of asterisk has this transport option, you can set TCP here and skip the next step.
Submit your changes and apply the configuration.
2. Setting up the extension to utilize TCP instead of UDP
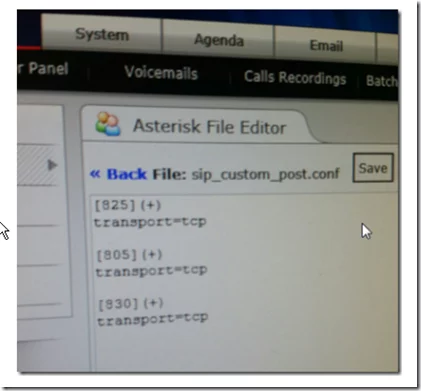
If you Asterisk version does not allow you to change the extension transport type from the extension edit GUI, you can do it in the sip_custom_post.conf file. Navigate to Tools->Asterisk File Editor and locate the sip_custom_post.conf file. Add the extension of your phone using the following syntax:
[EXT#](+)
transport=TCP
In the example shown below, there are three extensions in our lab setup that will use the CP-9971 phone, so we added them to the sip_custom_post.conf file. This will force these extensions to use TCP transport, a requirement for the CP-9971 IP phone.
Save and restart the Asterisk PBX.
Configuring the Cisco IP Phone
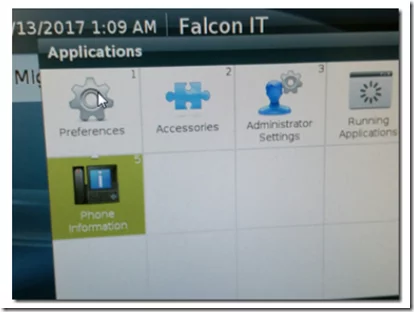
On your Cisco IP phone, select phone information from the applications menu.
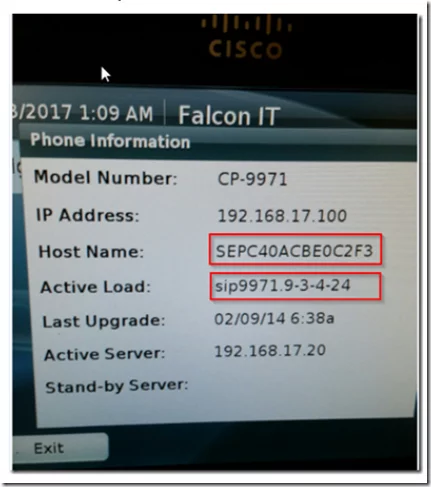
Note these two important pieces of information: the Host Name and the Active Load. Write them down, you will need them both.
On the server that has TFTP installed, open Windows notepad and copy/paste the XML text shown below.
<device>
<deviceProtocol>SIP</deviceProtocol>
<sshUserId>admin</sshUserId>
<sshPassword>password</sshPassword>
<devicePool>
<dateTimeSetting>
<dateTemplate>M/D/YA</dateTemplate>
<timeZone>Eastern Standard/Daylight Time</timeZone>
<ntps>
<ntp>
<name>pool.ntp.org</name>
<ntpMode>Unicast</ntpMode>
</ntp>
</ntps>
</dateTimeSetting>
<callManagerGroup>
<members>
<member priority=”0″>
<callManager>
<ports>
<ethernetPhonePort>2000</ethernetPhonePort>
<sipPort>5060</sipPort>
<securedSipPort>5061</securedSipPort>
</ports>
<processNodeName>AsteriskIP</processNodeName>
</callManager>
</member>
</members>
</callManagerGroup>
</devicePool>
<sipProfile>
<sipProxies>
<backupProxy></backupProxy>
<backupProxyPort>5060</backupProxyPort>
<emergencyProxy></emergencyProxy>
<emergencyProxyPort></emergencyProxyPort>
<outboundProxy></outboundProxy>
<outboundProxyPort></outboundProxyPort>
<registerWithProxy>true</registerWithProxy>
</sipProxies>
<sipCallFeatures>
<cnfJoinEnabled>true</cnfJoinEnabled>
<callForwardURI>x-serviceuri-cfwdall</callForwardURI>
<callPickupURI>x-cisco-serviceuri-pickup</callPickupURI>
<callPickupListURI>x-cisco-serviceuri-opickup</callPickupListURI>
<callPickupGroupURI>x-cisco-serviceuri-gpickup</callPickupGroupURI>
<meetMeServiceURI>x-cisco-serviceuri-meetme</meetMeServiceURI>
<abbreviatedDialURI>x-cisco-serviceuri-abbrdial</abbreviatedDialURI>
<rfc2543Hold>false</rfc2543Hold>
<callHoldRingback>2</callHoldRingback>
<localCfwdEnable>true</localCfwdEnable>
<semiAttendedTransfer>true</semiAttendedTransfer>
<anonymousCallBlock>2</anonymousCallBlock>
<callerIdBlocking>2</callerIdBlocking>
<dndControl>0</dndControl>
<remoteCcEnable>true</remoteCcEnable>
</sipCallFeatures>
<sipStack>
<sipInviteRetx>6</sipInviteRetx>
<sipRetx>10</sipRetx>
<timerInviteExpires>180</timerInviteExpires>
<timerRegisterExpires>1800</timerRegisterExpires>
<timerRegisterDelta>5</timerRegisterDelta>
<timerKeepAliveExpires>120</timerKeepAliveExpires>
<timerSubscribeExpires>120</timerSubscribeExpires>
<timerSubscribeDelta>5</timerSubscribeDelta>
<timerT1>500</timerT1>
<timerT2>4000</timerT2>
<maxRedirects>70</maxRedirects>
<remotePartyID>false</remotePartyID>
<userInfo>None</userInfo>
</sipStack>
<autoAnswerTimer>1</autoAnswerTimer>
<autoAnswerAltBehavior>false</autoAnswerAltBehavior>
<autoAnswerOverride>true</autoAnswerOverride>
<transferOnhookEnabled>false</transferOnhookEnabled>
<enableVad>false</enableVad>
<dtmfAvtPayload>101</dtmfAvtPayload>
<dtmfDbLevel>3</dtmfDbLevel>
<dtmfOutofBand>avt</dtmfOutofBand>
<alwaysUsePrimeLine>false</alwaysUsePrimeLine>
<alwaysUsePrimeLineVoiceMail>false</alwaysUsePrimeLineVoiceMail>
<kpml>3</kpml>
<phoneLabel>Company</phoneLabel>
<stutterMsgWaiting>1</stutterMsgWaiting>
<callStats>false</callStats>
<silentPeriodBetweenCallWaitingBursts>10</silentPeriodBetweenCallWaitingBursts>
<disableLocalSpeedDialConfig>false</disableLocalSpeedDialConfig>
<sipLines>
<line button=”1″>
<featureID>9</featureID>
<featureLabel>LabelName</featureLabel>
<proxy>USECALLMANAGER</proxy>
<port>5060</port>
<name>EXT</name>
<displayName>DispName</displayName>
<autoAnswer>
<autoAnswerEnabled>2</autoAnswerEnabled>
</autoAnswer>
<callWaiting>3</callWaiting>
<authName>EXT</authName>
<authPassword>Password</authPassword>
<sharedLine>false</sharedLine>
<messageWaitingLampPolicy>1</messageWaitingLampPolicy>
<messagesNumber>*97</messagesNumber>
<ringSettingIdle>4</ringSettingIdle>
<ringSettingActive>5</ringSettingActive>
<contact>EXT</contact>
<forwardCallInfoDisplay>
<callerName>true</callerName>
<callerNumber>false</callerNumber>
<redirectedNumber>false</redirectedNumber>
<dialedNumber>true</dialedNumber>
</forwardCallInfoDisplay>
</line>
</sipLines>
<voipControlPort>5060</voipControlPort>
<startMediaPort>16348</startMediaPort>
<stopMediaPort>20134</stopMediaPort>
<dscpForAudio>184</dscpForAudio>
<ringSettingBusyStationPolicy>0</ringSettingBusyStationPolicy>
<dialTemplate>dialplan.xml</dialTemplate>
<softKeyFile></softKeyFile>
</sipProfile>
<commonProfile>
<phonePassword></phonePassword>
<backgroundImageAccess>true</backgroundImageAccess>
<callLogBlfEnabled>2</callLogBlfEnabled>
</commonProfile>
<loadInformation>ActiveLoad</loadInformation>
<vendorConfig>
<disableSpeaker>false</disableSpeaker>
<disableSpeakerAndHeadset>false</disableSpeakerAndHeadset>
<pcPort>0</pcPort>
<settingsAccess>1</settingsAccess>
<garp>0</garp>
<voiceVlanAccess>0</voiceVlanAccess>
<videoCapability>0</videoCapability>
<autoSelectLineEnable>0</autoSelectLineEnable>
<webAccess>1</webAccess>
<daysDisplayNotActive>1,2,3,4,5,6,7</daysDisplayNotActive>
<displayOnTime>00:00</displayOnTime>
<displayOnDuration>00:00</displayOnDuration>
<displayIdleTimeout>00:00</displayIdleTimeout>
<spanToPCPort>1</spanToPCPort>
<loggingDisplay>1</loggingDisplay>
<loadServer></loadServer>
</vendorConfig>
<userLocale>
<name></name>
<uid></uid>
<langCode>en_US</langCode>
<version>1.0.0.0-1</version>
<winCharSet>iso-8859-1</winCharSet>
</userLocale>
<networkLocale></networkLocale>
<networkLocaleInfo>
<name></name>
<uid></uid>
<version>1.0.0.0-1</version>
</networkLocaleInfo>
<deviceSecurityMode>1</deviceSecurityMode>
<authenticationURL></authenticationURL>
<directoryURL></directoryURL>
<servicesURL></servicesURL>
<idleURL></idleURL>
<informationURL></informationURL>
<messagesURL></messagesURL>
<proxyServerURL></proxyServerURL>
<dscpForSCCPPhoneConfig>96</dscpForSCCPPhoneConfig>
<dscpForSCCPPhoneServices>0</dscpForSCCPPhoneServices>
<dscpForCm2Dvce>96</dscpForCm2Dvce>
<transportLayerProtocol>4</transportLayerProtocol>
<capfAuthMode>0</capfAuthMode>
<capfList>
<capf>
<phonePort>3804</phonePort>
</capf>
</capfList>
<certHash></certHash>
<encrConfig>false</encrConfig>
< /device>
Save the file as the ‘host_name.cnf.xml’ inside the TFTP folder.
For example, if the IP phone’s host name is SEPC40ACBE0C2F3 then save the file as SEPC40ACBE0C2F3.cnf.xml.
When finished, edit the file with notepad and change the fields listed below in BLUE. You can change other fields to fit your preferences; all the descriptions and options are documented in this GitHub site as well as in usecallmanaer.com.nz.
<processNodeName>Asterisk IP</processNodeName>
Insert your Asterisk PBX IP address or FQDN here.
<featureLabel>LabelName</featureLabel>
Insert the phone label name (keep it short < 10 chars)
<phoneLabel>Company</phoneLabel>
Company or department name (<10 chars)
<name>EXT</name>
Phone Extension
<contact>EXT</contact>
Phone Extension
<displayName>DispName</displayName>
Display Name (<10 chars)
<authName>EXT</authName>
Phone Extension
<authPassword>Password</authPassword>
Extension Password
<loadInformation>ActiveLoad</loadInformation>
Your phone’s Active Load information (it must match)
When finished, reset and power cycle your phone and it will be configured automatically.

